


Easy 8x6 Wood Shed Plans for Beginners: A Comprehensive Guide
Constructing a shed can seem daunting, but with careful planning and execution, even novice DIY enthusiasts can successfully build a functional and aesthetically pleasing structure. This comprehensive guide provides detailed plans for an 8x6 wood shed, tailored specifically for beginners. We'll break down the process into manageable steps, ensuring a rewarding and achievable project.
Phase 1: Planning and Preparation
Before commencing any construction, thorough planning is paramount. This phase involves several crucial steps that will lay the foundation for a successful build.
Site Selection and Preparation
The location of your shed significantly impacts its functionality and longevity. Choose a level area with easy access for material delivery and future use. Clear the site of any debris, vegetation, or obstacles. Consider factors like sunlight exposure, proximity to utilities, and drainage. Ideally, the ground should be relatively level; significant grading might require additional expertise or equipment. Check local building codes and regulations regarding shed placement and permits; this may involve setbacks from property lines and other restrictions.
Material Acquisition and Cost Estimation
Creating a detailed materials list is essential for accurate budgeting and efficient purchasing. The quantities listed below are estimations and may need adjustment based on specific needs and lumber dimensions. Always purchase extra materials to account for cuts, mistakes, and potential damage. Compare prices from different suppliers to find the best value. A comprehensive list should include:
- Pressure-treated lumber for the base (4x4 posts, 2x6 runners)
- Untreated lumber for the walls and roof (2x4 studs, 2x6 rafters)
- Plywood or OSB for the sheathing (roof and walls)
- Roofing material (e.g., asphalt shingles, metal roofing)
- Siding (e.g., vinyl, wood)
- Doors and windows (consider pre-hung units for ease of installation)
- Fasteners (nails, screws, bolts)
- Concrete (for the foundation, if using a concrete base)
- Construction adhesive
- Weatherstripping and sealant
Tool Acquisition and Safety
Ensuring you have the necessary tools is crucial for a smooth and safe construction process. Invest in or borrow quality tools, including but not limited to:
- Measuring tape
- Level
- Shovel
- Post hole digger (if using post holes for the base)
- Circular saw
- Drill with various drill bits
- Hammer
- Safety glasses
- Work gloves
- Hearing protection
Prioritize safety throughout the project. Wear appropriate safety gear, use tools correctly, and take breaks when needed. If unsure about any aspect of the construction, consult with an experienced builder or contractor.
Phase 2: Foundation Construction
A stable foundation is the cornerstone of a durable shed. This section outlines two common foundation options suitable for beginners.
Concrete Slab Foundation
This method offers superior stability and longevity. Begin by excavating the area to a depth of at least 4 inches. Compact the soil thoroughly. Create a formwork using lumber, ensuring levelness. Pour the concrete, ensuring even distribution and proper consolidation to eliminate air pockets. Allow sufficient curing time before proceeding with the shed construction. Remember to account for proper drainage around the concrete slab.
Pressure-Treated Lumber Base
This simpler option is cost-effective and relatively easy to construct. Begin by setting 4x4 pressure-treated posts into the ground, ensuring they are plumb and level. You can use concrete footings for added stability or dig post holes and backfill with gravel and concrete. Connect the posts with 2x6 pressure-treated runners, creating a rectangular frame. This base provides a level surface for the shed's floor.
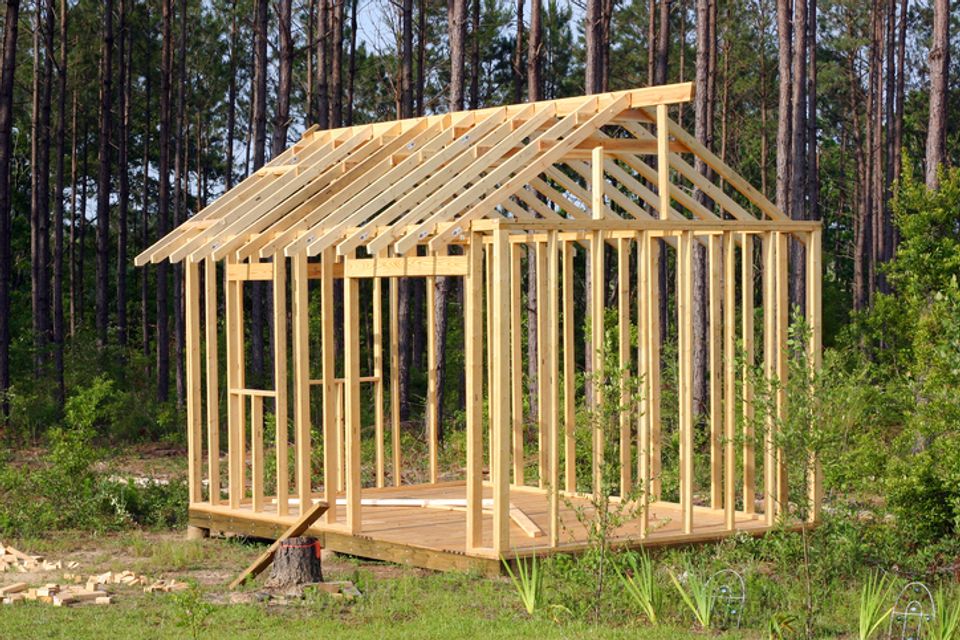
Phase 3: Shed Frame Construction
Once the foundation is complete, the next step involves constructing the shed's frame. Accuracy in this phase is critical for a structurally sound and aesthetically pleasing shed.
Floor Framing
Construct the floor frame using 2x6 joists, spanning the width of the shed. Ensure proper spacing and support. Attach the joists securely to the base frame. For added strength and stability, consider adding diagonal bracing to the floor frame.
Wall Framing
Build the wall frames using 2x4 studs, spaced according to building code requirements (typically 16 inches on center). Construct each wall separately on the ground before raising them onto the floor frame. Use appropriate bracing to maintain squareness during construction. Ensure proper alignment and fastening to the floor frame.
Roof Framing
Construct the roof frame using 2x6 rafters, ensuring proper slope for water runoff. The rafter spacing should align with building codes. Install ridge boards and ensure proper fastening to the wall frames. Consider using additional bracing for roof stability, particularly in windy areas.
Phase 4: Sheathing, Siding, and Roofing
This phase focuses on the exterior finishing of the shed, protecting it from the elements and enhancing its aesthetic appeal.
Sheathing
Attach plywood or OSB sheathing to the walls and roof, creating a solid surface for the siding and roofing materials. Ensure proper alignment and fastening. Use appropriate weather-resistant sealant to prevent moisture intrusion.
Siding
Install the chosen siding material according to the manufacturer's instructions. Ensure proper alignment, overlap, and fastening. Maintain consistent spacing and alignment for a professional finish.
Roofing
Install the roofing material, starting from the bottom and working upwards. Ensure proper overlap and fastening to prevent leaks. Consider adding underlayment for extra protection against moisture. Follow the manufacturer's instructions for proper installation.
Phase 5: Doors, Windows, and Finishing Touches
The final phase involves installing doors and windows and adding the finishing touches to complete your shed.
Door and Window Installation
Install the pre-hung doors and windows, ensuring proper alignment and sealing. Use appropriate shims to ensure levelness. Caulk around the frames to prevent drafts and moisture intrusion.
Final Touches
Add any desired finishing touches, such as painting, trim work, or additional features like shelves or workbenches. Consider adding weather stripping around doors and windows for improved insulation and weather resistance. Clean up the construction site, removing all debris and excess materials.
Building an 8x6 wood shed is a rewarding project that can enhance your property and provide valuable storage space. By following these detailed plans and prioritizing safety, even beginner DIY enthusiasts can successfully complete this project. Remember to consult local building codes, use quality materials, and take your time. Enjoy the process and the satisfaction of creating something with your own two hands!


No comments:
Post a Comment
Note: Only a member of this blog may post a comment.